Showing posts with label photo recipe. Show all posts

Tuesday, 12 July 2016

Add Soft Evening Sun Glow with Photo Veils [Photo Recipe]


Japanese Anemones, sometime also called "Pink Saucers", are some of my favourite flowers. I like the slim and long stem, and the pale pink flowers, with uneven petals, the orange stamen and the light green receptacle. 

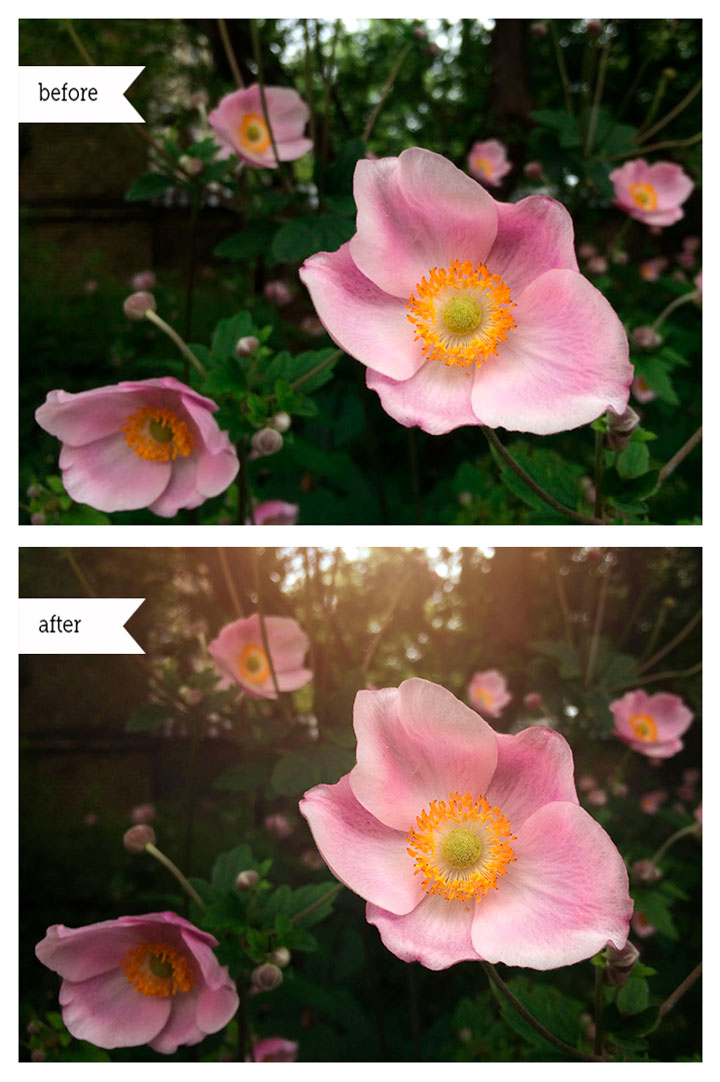
Yesterday evening we walked by a whole field of Pink Saucers - such a beautiful sight! My big camera was at home, so I took some photos with my iPhone camera. It was cloudy and about to rain - which gave a fine and even light - but as I edited the photos today, I wanted to create a feeling of a setting sun behind the flowers, using photo veils from Love that Shot.

Photo recipe:

  • I cropped the photo, leaving the flower in focus to the right side of the photo. In Lightroom, I sharpened the flower in focus, boosting slightly the clarity, sharpening and contrast, with the brush mask. 
  • Then I opened the photo in Photoshop, and applied the Privet photo veil from the Botanical Collection, using soft light blending mode with 50% opacity.
  • To create a mild vignette effect, I applied Low Spotlight Right photo veil from the Illumination Collection using soft light blending mode 100%.
  • The Evening Sun Glow effect is created with 2 photo veils:


I like to tweak my photos with photo veils and textures - they enable me to create a photo with just the right mood and light, I wish to convey.


Photo veils enable me - literally - to create some sunshine to a cloudy day ... Maintaining the natural look I appreciate, since I can adjust both the volume of the effect, by choosing the blending mode and the opacity.


Every now and then I edit some of my iPhone photos in Lightroom and Photoshop - like the photo from yesterdays walk. 


Now that I know where to find the Japanese Anemones, I will try going back with my big DSLR camera, to take even sharper photos with shallow depth of field... to be able to make a large print of these beauties, the sea of "Pink Saucers".


... Wishing you an inspiring and beautiful summer:

Let us enjoy the moments outside -
The Scandinavian summer is short,
so each moments out in the Great Outdoors 
is to be cherished, 

Nina


Sunday, 31 January 2016

Create Rustic Background to Your Still Life [Photo Recipe]


January calls for cozy moments inside, both gathering with family and friends inside with tea and coffee, and moments alone in a peaceful corner, getting in deep with a book or knitting. I wanted to create a Still Life photo, that has a warm feeling of indoors coziness.

White flower with the coffee colored tiny petals in the middle, inspired me to use an old, iron coffee table as a table top and a light brown panel backdrop. I chose a simple composition with a black espresso cup, to give contrast to the ivory colored flower.


Photo recipe:

1. I opened the photo in Lightroom, checking the cropping of the image, to secure that my motive is horizontally in the middle of the frame.
2. With the brush tool, I sharpened the flower and increased slightly the contrast and the exposure of the flower.
3. Thereafter I opened the image in Photoshop, and added the Calais texture from the Olde World Collection by Love that Shot, with blending mode soft light 35 %. 
4. I removed the texture from the flower with the brush function with 100 % opacity, and from the cup using 50 % opacity.

Simple as that! I like the natural warmth, the textures from Olde World Collection add to the images. I like to use them especially in Still Life photography to create rustic background effects.

What brings you inspiration in photography in January - February?


... Until next time,

Nina


[This post contains affiliate links.]

Tuesday, 29 December 2015

Create a Light Matte Effect with Photo Veils [Photo Recipe]


There is just something about perfume and eau de toilette bottles ... I have always been enchanted by the form and the way the light reflects through the glass, showing the color of the perfume, and leaving a pretty shadow on the table.

As we were traveling home after Christmas Holidays with my family a few years ago, we had some time before boarding at Helsinki Airport. As we walked about in the Duty Free shops, I fell for a delicate, light and feminine scent - that is, Coco Chanel's Mademoiselle. I bought a Mademoiselle Fresh Hair Mist to start with, and as you may guess - Mademoiselle is still my favorite scent. 

This Christmas my dear husband did surprise me with my first perfume ever ... A tiny, yet so pretty, bottle of my favorite scent! I wasn't expecting such a luxurious present at all! 

I wanted to capture this beautiful perfume bottle and the feeling of Christmas - so I placed the perfume bottle in front of the Christmas candle decorations and the perfume packages.

The photo is taken in low light, so I used a tripod, with Nikkor 18-55 mm lens and the following settings: 
ISO 800,  1/6 sec at f 5,6.

My aim in editing the photo was to achieve a dreamy feeling, focusing on the perfume bottle - letting the background be a bit blurred and out of focus. 
I wanted to add a bit of a luxurious and calm mood, with creating a light matte effect using a photo veil.


Photo recipe

This is how I proceeded with the editing:

1. I opened the image in Lightroom and adjusted the white balance, decreasing the warmth a bit. 

2. With a brush function, I sharpened the perfume bottle a bit, increasing slightly both the clarity, highlights and whites. 
I tweaked the shadows as well, opening them just a bit.

3. Thereafter I opened the image in Photoshop, and added a photo veil called Snow Lily, from the Botanical Collection. Using blending mode Screen, with opacity 10%, I created a light matte effect - with calm and a bit exquisite mood.
With the brush function with opacity 80%, I removed quite a bit of the matte effect from the perfume bottle, making it stand out eye-catching, with increased clarity and sharpness.


There are different ways of creating a matte effect - Using a photo veil of your choice, with blending mode Screen, is an easy way of creating just the amount of matte effect, you find pleasant and fitting to your image.


...Wishing you creative moments with photography and editing,

Nina

Sunday, 22 November 2015

Natural Vivid Saturation with Photo Veils from Mobile Collection [Photo Recipe]


The parks and forests around The Hermitage Palace in Copenhagen are clothed in yellow, orange and red foliage each fall. The garden is a popular place for outings and walks. Besides the beautiful nature, you may be lucky and meet a deer or two, as they are crossing an open field.

We enjoyed the late afternoon sun the other Sunday, walking across the park to the Hermitage Palace. We did not spot a deer - but I noticed a symmetrical reflection on the lake. The battery of my iPhone was low, so I took this photo with my husbands iPhone 6. I have edited it with my own iPhone 5S - using two photo veils from the mobile collection from Love that Shot.


To start with, I cropped the photo in Snapseed photo application. I opened also the shadows slighgtly, and sharpened the tree in the middle. 

Thereafter I opened the photo in Enlight photo application, and edited the grain and noise in the lake using the Denoise 40% -effect. After these slight basic edits, I opened the photo in Filterstorm application, and added two photo veils from The Mobile Collection.

This is how I proceeded - Photo recipe:
 
  • I opened the photo in Filterstorm photo application in my iPhone.
  • Choosing the "Edit"-option, and thereafter tapping the "+Image" icon, I was able to choose a photo veil called Belladonna, from the Mobile Veil Collection. Having saved the Mobile Veil Collection on my photo library of my iPhone, I easily can add the veils to my mobile photos. Filterstorm has a "Fit Image" option, that automatically fits the veil to your photo. So you do not need to worry, if you have a square veil and a rectangular photo - the app makes the veil fit perfectly your photo.
  • I tried different blending modes - blending mode "Hue" would give a bright orange tone to the photo.
  • Going for a more natural look, I chose blending mode "Soft Light".

  • Filterstorm allows you to choose both the size of the brush both when masking and brushing.
  • I added the veil using blending mode Soft Light, with 20 % opacity.
  • Thereafter I brushed the veil effect from the tiny tree in the middle, using brush with 40 % opacity.
  • After this, I added the mobile photo veil Privet, also from the Mobile Collection, using blending mode Soft Light with 15% opacity - brushing the veil again from the little tree in the middle.
<

Photo veils make soft changes to your photos, when using blending mode Soft Light. I like the natural vivid effect to the saturation and colors the veils have added to my photo above.

I like to take photos with my mobile phone, and edit them as well with the photo apps and veils. My parents and family back in Finland do like to receive photos via e-mail and social media apps - "A picture is worth a thousand words".

Photo veils are available also in larger sizes - you'll find them by clicking this link to Photo Veil Collections by Love that Shot.

... Until next time, Nina

Saturday, 18 April 2015

Create a Painterly Canvas Effect with Textures and Photo Veil [Photo Recipe]


Easter Tulips and the first episodes of the 4th season in Downton Abbey, inspired me to create this still life photo with a painterly canvas effect. 
At times I wish it would be possible to live one day in the early 19th-century ... Either in an aristocratic British family or on a Souther cotton farm in America. I would love to experience the interior design and the style of the dresses, and the etiquette in general, trying to perceive the difference in classes those days - that may be a bit hard to imagine in our modern society. 

I used a burlap cloth as a back drop to my image. I made the setting beside a window, using natural side light coming from the left. I did set the books, the can with the tulips, the small plate with a single tulip and a dried leaf to the right side of the frame, leaving the negative space to the left - for the painterly canvas effect, that would create the warm, old mood to the image.


This is how I proceeded with the editing and adding layers:

1. I adjusted the cropping of the image, making use of the rule of thirds, so that the tulip on the silver plate is in line with one of the golden sections.
2. I sharpened the image a bit, and adjusted the contrast, highlight and shadows in Lightroom.
3. Thereafter I opened the image in Photoshop, and added the following layers with 3 textures and one photo veil:
  • Camembert texture from Olde World Collection with blending mode Saturation, opacity 40%. Blending mode Saturation with the Camembert texture creates a vintage-like warm glow to the image - you will notice this effect when you look at the books in the before-after-image below. I brushed the texture effect away from the tulips, since I wanted to keep some of their blue-lilac color.
  • Lavendel Glow Left - Vertical photo veil from the Illumination Collection with blending mode Soft light, opacity 15%, adds a soft lavendel light effect.
  • Salerno texture from the Olde World Collection with blending mode Soft light 15% adds a mild and soft painterly effect. I brushed some of the effect away from the upper right corner, using a brush with 50% opacity.
  • Riviera texture from Olde World Collection with blending mode Hard Light, opacity 39%, adds some more painterly effect to the image. Using a brush I removed the texture effect from the tulips and the books - leaving it on the negative space, to my "canvas" background


What I like about Still Life Photography is the process of creating the image - Both setting up the scene, and the post processing ... Thinking about the light, the shadows, the balance, and what I want to focus on, together with the style and the feeling, I wish to convey. 
Already as I was setting up the books and the tulips, I had the textures from Olde World Collection in my mind - I like the rustic touch and the warm colour effect they create.

...Wishing you creative moments with photography and editing,

Nina


Monday, 26 January 2015

Add a Warm Vintage Glow with Photo Veils [Photo Recipe]


Printing my photos - using them as post cards or greetings for birthdays - is something I plan to do more often this year. And to start with, I will make a series of Still Life photos with simple motives, that will convey a warm and peaceful feeling. 

My mom has a bunch of old bottles, she has gotten from a friend of hers, whose mom was a pharmacist. The memories from my childhood - seeing these bottles filled with flowers - inspired me to compose the image above. To create a touch of vintage, I used a coffee-toned cloth, together with a brown masonite board as a back drop. I photographed the image beside our kitchen window, where the light is best in the afternoon. My camera settings were following: 1/60 sec, f/3.5, ISO 800.


Photo recipe:

1. I checked the cropping of the image, to secure, that my motive is in the middle of the frame, and adjusted the brightness and contrast.
2. I added the Rosy Glow Veil from the Illumination Collection blending mode soft light, 70% opacity. This veil creates a mild and warm glow to the photo.
3. In order to underline the light, that comes from the upper lift corner, I added the Sunshine 2 top left vertical photo veil from the Illumination Collection, with blending mode soft light, opacity 36%.
4. To create a natural vignette, I added the Medium spotlight top photo veil, also from Illumination Collectionwith blending mode soft light 100%.
5. Finally, I added the Privet photo veil from the Botanical Collection to create a touch of vividness and depth, with blending mode softlight 29%.

"Say it with flowers"-works fine with photography cards  as well... Receiving a card via Snail Mail makes one happy today, when a great deal of our communication and greetings takes place via via e-mails and social media.

I hope this photo recipe has inspired you to create and fine tune the mood and feeling in your photos, you wish to convey with them. 
Let's keep on clicking our cameras - and let us not forget to make use of the images we capture!


...Until next time,
Nina


Wednesday, 7 January 2015

Create a Frosty Window-effect with Classic Vintage Photo Editor


Classic Vintage Photo Editor is one of my favourite mobile photo applications in creating silky and frosty effects to my iPhone photos. I will here show you can create a Frosty Window effect using Classic Vintage Photo Editor and Image Blender iPhone applications.

This is the original image, which I have taken with iPhone 5S, using the external Olloclip macro lens, that I attached to my iPhone for taking this close-up photo.


Tutorial: 9 Steps to Create a frosty Window-Effect

Open the photo you wish to edit in the Classic Vintage Photo Editor. You will see that the app will automatically apply random effect layers on your photo - You need to start with setting the effect of these layers to 0% opacity: 

1. As shown below, choose the Sepia effect, and adjust it to 0% opacity.


2. Then, in the same way, choose the Border effect, and adjust it to 0% opacity.

3. Now choose the Crackle effect, and choose the Nevada layer from the right (shown below - number 8 from the top), and adjust the opacity of the layer to 50%. 


4. Do the same with the Paper layer - Choose the Nevada-effect shown to the right, that is, number 2 from the top, and set it also to 50% opacity. 


5. That was easy, wasn't it! Now you have finished editing your photo in the Classic Vintage Photo app, and it is time to save the photo on your camera roll: 
Choose Share, and photo library - now your image is saved in the camera roll of your iPhone.


I wanted to remove the frosty effect from the middle of my photo - to get the sharpness and clarity of my original image to the center point - and I used Image Blender app for this. 

So from now on, we proceed in the Image Blender app:

6. Open first your original image in the Image Blender app, by clicking the icon in the lower left corner - your camera roll opens, and you can now choose your original image.


7. Then click the lower right icon, and choose the Frosty Window from your camera roll.


8. Choose the Mask option, and remove the Frosty Window effect from the desired area of your photo. Click the Save option in the upper right order. 


9. Then set the opacity continuum all the way to the right, so you can see the Frosty Effect photo, now with a clear and sharp (your original image) being visible in the middle - and save your image to your camera roll.


And, that's it - 9 easy steps to create a beautiful, winter image ... Like looking through a Frosty Window. This is my favourite combination at the moment in Classic Vintage Photo Editor.


What are your favourite apps at the moment? 

Come and link your recent mobile photos to App Happy Wednesday hosted by Barb at Keeping With The Times.

... With App-Happy greetings,
Nina


Classic Vintage Photo Editor is at the moment free in the App Store. Image Blender is available in App Store for $ 2,99. 


Monday, 29 December 2014

Create a frozen effect with textures & photo veils [Photo Recipe]


Just hear those sleigh bells jingling, Ring-ting-tingling too, 

Come on, it's lovely weather, For a sleigh ride together with you.

Outside the snow is falling, And friends are calling, "Yoo hoo"...


You can just imagine the shouts of joy this Christmas morning, as we opened the curtains and saw that it was snowing outside! In the afternoon we took a long walk outside: It was wonderful to hear the snow under our feet, to breath the cold air, and just enjoy the white landscape around us.

I had my camera with me - I was looking for a motive for next years Christmas Cards. As I spotted these red heart-formed leaves covered with snow, I knew I had found it: With a few layers of textures and photo veils, I would create a hazy, frozen feeling to the image. 


You see below a step by step-tutorial on how I proceeded with the editing - I ended up using 7 layers of textures and photo veils.

Photo Recipe:
1. In order to highlight the red leaves, making them to stand out a bit more, I used the lasso tool in Photoshop: I masked the red leaves in the middle of the photo by drawing a circle with the lasso tool around them, and adjusted the brightness up to 29 and the contrast up to 7, inside the circle. I did set the feather for the mask up to 70%
2. Thereafter I started to add layers of textures and photo veils:
--> I used the brush tool with each layer, to erase the texture and photo veil effects from the area around and on top of the red leaves.

... I'm sending you a fresh and snowy greeting, hoping to have inspired your creativity - Textures and photo veils are lovely to work with, creating just the amount of effect that suits to your photos and personality.

With Happy Holiday greetings,

Nina


Monday, 29 September 2014

Add a warm glow to your phone photos with mobile photo veils [Photo recipe]


The ground is covered with yellow and red leaves, together with the pretty, round chestnuts. It is a pleasure to walk outside, breathe the fresh air  and hear the sound of the dry leaves under my feet. 

I like to take a few pictures in my daily walks outside ... sharing often these moments with my family abroad. It is so easy to send the photos I capture: The pictures are taken with my iPhone, so all I need to do is to attach them to a mail or to a text.

I want to share with you here the process of creating the bokeh image above, using 4 phone applications and two photo veils from the mobile collection by Love That Shot.


Photo recipe:

1. I took the photo of the chestnut with the built in camera in the Camera+ -app, saving it with no adjustments to my camera roll.

2. Using the Filterstorm-app, I increased slightly the darkness in the bottom of the the photo, with the Levels-function.

3. Then I increased the ambiance and contrast of the image in Snapseed-app.

4. Thereafter I opened the photo in Tadaa SRL - app, where I masked the chestnut, selecting the linear aperture mode and increasing the range of the effect a bit.

5. I used the Filterstorm for upsizing the photo. Some phone photo-applications resize the image size, which is the reason I take my photo to Filterstorm a few times under editing it. You can upsize the photo by selecting the "export"-function, and choosing the "Png"-format instead of the "Jpeg"-format. The image size of the Png-format is often twice as large as the Jpeg-format.

6. In Snapseed-app I selected the "details"-function, and sharpened the photo with 16% and streghtened the structure of the photo with 17%.

7. I opened the photo in Filterstorm-app, and added the following photo veils from the mobile collection by Love that Shot
 - Privet Photo Veil, blending mode Soft Light with 100% opacity. 
 - Honey Wheat Photo Veil, blending mode Soft Light with 40 % opacity.

8. In Snapseed-app I chose the Center focus-effect, focusing on the chestnut with the following adjustements: -35% outer brightness, +30 inner brightness and 0% blur.

9. Finally, I upsized the photo in Filterstorm-app.


Mobile Photo Veils are easy to use: I have downloaded them to my iPhone, where I have made a special album for them, so I quickly can find the veil I am looking for. You may have noticed that Privet is my favourite photo veil - I like the way it adds warm tones to the photo, in a natural and subtle way.

I hope this photo recipe has inspired you to create images with a bokeh effect, and experiment with the natural mobile veils and textures from Love That Shot,

With colourful Fall greetings,

Nina

Monday, 1 September 2014

Add a warm glow to your food photography with photo veils [Photo Recipe]


A culinary experience consists of tastes, scents, visual inputs, sounds and sensory experiences ... like
  • Enjoying the sight of a beautifully set table, 
  • Hearing the crispy top of a cake crack as you cut it, 
  • Smelling the sweet cinnamon and apples, 
  • Seeing the colours and feeling the crispiness of the cake blending with the soft and airy cream, and
  • Experiencing a symphony of taste as you take the first bite ...
Is your mouth watering by now? All of our five senses are being activated when we eat. Therefore it is worth going an extra mile when taking pictures of the dishes being prepared, served and enjoyed.

We are eating with out eyes, so you want to focus especially on the details in food photography.
I added a tiny branch with flowers to the corner of the plate to give a feeling of festive coziness. I had the colour play in mind as well: The white and yellow flowers, and the green needles, go together with the green marzipan and the colours in the lemon slice. 

In editing I wanted to create an overall warm glow to the photo. To achieve a natural look, I decided to use photo veils from Love That Shot, since they blend softly and seamlessly to the image.


Photo recipe:
  • I started with increasing slightly the brightness and the contrast of the original image.
  • Thereafter I added the following 2 photo veils:
    • Lychee photo veil from the Botanical Collection  blending mode soft light with 100 % opacity. I used a soft brush with 50 % opacity and removed some of the veil from the cake and the plate.
    • Serendipity photo veil from Simplicity Collection, using blending mode soft light with 30 % opacity.
And that's it - easy and delicious - Ain't it!

Why don't you give it a go and try photo veils: You can download a FREE sample by following this link to Love That Shot-website.

... With Scrumptious greetings,

Nina

Wednesday, 6 August 2014

Create a Natural Spotlight with Photo Veils {Photo Recipe}


My dear friend, who loves vintage and makes fantastic finds in flee markets, has moved to an older farming house to the province with her family. I photographed her beautiful home when visiting her for the very first time - a series of images I thought of giving to her as a special present - encouraging her to follow her dream of becoming an interior decorator. 

My aim with this picture was to highlight the turquoise creamer and to convey the feeling of being in a cozy landscape kitchen. I focused on the creamer, using my 18-55 lens with shutter speed 1/125 and aperture f/7.1 with center-weighted metering. I took the picture from a low angle, and placed the tray with the creamer in between the two vertical lines of the table, to strengthen the depth of field in the photo.

The image straight out of camera was compositionally fine, but I still wished that the creamer would stand out even more. I used two photo veils and a texture from Love That Shot, together with minor adjustments with brightness, in order to create a natural spotlight on the creamer. 


Photo recipe:
  1. I added the Privet photo veil from the Botanical Collection in Adobe Photoshop, using blending mode soft light with 76 % opacity. I like the warm shades this veil adds to the image - deepening the colour of the table in a natural way. I used a soft round brush to remove the veil from the creamer and the tray, and also from the white wall behind the table.
  2. I then chose the lasso tool in Photoshop and created a mask around the milk in the creamer, and increased slightly the brightness. To soften the edge of the layer mask, I sat the feather for the mask around 100 px.
  3. The second photo veil, The Low Spotlight Bottom from the Illumination Collection, with blending mode vivid light 60 %, highlighted the creamer in a delicate way. I brushed the veil away from the white wall in the upper left corner of the image, using soft round brush.
  4. I created a layer mask on the creamer and brightened the turquoise to a hardly noticeable lighter shade.
  5. To deepen the soft, warm feeling in the wooden table and the chairs, I added the Venice texture from the Olde World Collection, using blend mode multiply 33 %. Once again, I brushed the texture away from the tray, creamer and the white wall.
  6. Taking a last look at the photo, I decided to remove the tiny spots of milk next to the bigger milk spot on the creamer. 
Every now and then it is a pleasure to give an extra tweak to lifestyle photos - thereby creating the tiny difference, that will lift your photos from ordinary to something special!

Have you not tried photo veils yet, follow this link to Love That Shot-website, where you can download a FREE sample!


Let's keep on noticing and capturing the moments in our everyday life...


Until next time,

Nina

{PS. I am away from the blog - this is posted with the help of Bloggers pre-post planner}

Sunday, 29 June 2014

Enchange Your Mobile Photos with Photo Veils {Photo Recipe}


The warm summer days have arrived ... The familiar landscape is dressed in green shades. The weather has been unstable this week, changing from sunshine to rain and thunder, even hail - I have enjoyed photographing the marvellous and massive clouds, that are being formed above the open landscape.

I'm so excited to share with you great news: 6 lovely photo veils and 6 textures from Love That Shot are now available as a mobile collection. Each veil and texture is available in 3 formats: Horizontal, vertical and square. 


I carry my iPhone with me and use it as a camera, capturing moments and scenes along my way. Having the photo veils directly on my iPhone makes it both easy and fun to add and share the pictures directly from my iPhone. 


I have added two photo veils to the image above, using  the Image Blender-App. The image Blender-App is an application that enables you to do merge two or more photos together. 

You can add layers on your photo and use 18 different blending modes - soft light blending mode included - my favorite blending mode when using texture layers and photo veils. Image Blender-App has also a mask function, whereby you can brush some parts of the texture / veil from your image. 


Photo recipe:
  • I started with adding the Honey Wheat mobile veil with the Image Blender app, using blending mode soft ligt with 59% opacity.
  • Therafter I added  the Chamomille mobile veil. I masked the veil, brushing the veil-layer away from the clouds, to sustain the pure, white tones in the clouds. Thereafter I changed the blending mode to multiply, with 50 % opacity.
Photo veils add a natural depth and vignette in your photos. Having them available on mobile devices makes it so easy to use them on the daily photos - editing and sharing directly from your mobile phone or tablet!

It's nice to make delicate enchangements to the summer photos on the go with the Mobile Veils & Textures - Thanks so much Misty and Michelle, the founders of Love That Shot, for making the Mobile Collection!

Until next time, 
Nina

PS: Have you checked my tips for Capturing the Holidays and Making the Memories Last in my latest article on Love That Shot-blog?


//