Showing posts with label tutorial. Show all posts

Saturday, 18 April 2015

Create a Painterly Canvas Effect with Textures and Photo Veil [Photo Recipe]


Easter Tulips and the first episodes of the 4th season in Downton Abbey, inspired me to create this still life photo with a painterly canvas effect. 
At times I wish it would be possible to live one day in the early 19th-century ... Either in an aristocratic British family or on a Souther cotton farm in America. I would love to experience the interior design and the style of the dresses, and the etiquette in general, trying to perceive the difference in classes those days - that may be a bit hard to imagine in our modern society. 

I used a burlap cloth as a back drop to my image. I made the setting beside a window, using natural side light coming from the left. I did set the books, the can with the tulips, the small plate with a single tulip and a dried leaf to the right side of the frame, leaving the negative space to the left - for the painterly canvas effect, that would create the warm, old mood to the image.


This is how I proceeded with the editing and adding layers:

1. I adjusted the cropping of the image, making use of the rule of thirds, so that the tulip on the silver plate is in line with one of the golden sections.
2. I sharpened the image a bit, and adjusted the contrast, highlight and shadows in Lightroom.
3. Thereafter I opened the image in Photoshop, and added the following layers with 3 textures and one photo veil:
  • Camembert texture from Olde World Collection with blending mode Saturation, opacity 40%. Blending mode Saturation with the Camembert texture creates a vintage-like warm glow to the image - you will notice this effect when you look at the books in the before-after-image below. I brushed the texture effect away from the tulips, since I wanted to keep some of their blue-lilac color.
  • Lavendel Glow Left - Vertical photo veil from the Illumination Collection with blending mode Soft light, opacity 15%, adds a soft lavendel light effect.
  • Salerno texture from the Olde World Collection with blending mode Soft light 15% adds a mild and soft painterly effect. I brushed some of the effect away from the upper right corner, using a brush with 50% opacity.
  • Riviera texture from Olde World Collection with blending mode Hard Light, opacity 39%, adds some more painterly effect to the image. Using a brush I removed the texture effect from the tulips and the books - leaving it on the negative space, to my "canvas" background


What I like about Still Life Photography is the process of creating the image - Both setting up the scene, and the post processing ... Thinking about the light, the shadows, the balance, and what I want to focus on, together with the style and the feeling, I wish to convey. 
Already as I was setting up the books and the tulips, I had the textures from Olde World Collection in my mind - I like the rustic touch and the warm colour effect they create.

...Wishing you creative moments with photography and editing,

Nina


Wednesday, 7 January 2015

Create a Frosty Window-effect with Classic Vintage Photo Editor


Classic Vintage Photo Editor is one of my favourite mobile photo applications in creating silky and frosty effects to my iPhone photos. I will here show you can create a Frosty Window effect using Classic Vintage Photo Editor and Image Blender iPhone applications.

This is the original image, which I have taken with iPhone 5S, using the external Olloclip macro lens, that I attached to my iPhone for taking this close-up photo.


Tutorial: 9 Steps to Create a frosty Window-Effect

Open the photo you wish to edit in the Classic Vintage Photo Editor. You will see that the app will automatically apply random effect layers on your photo - You need to start with setting the effect of these layers to 0% opacity: 

1. As shown below, choose the Sepia effect, and adjust it to 0% opacity.


2. Then, in the same way, choose the Border effect, and adjust it to 0% opacity.

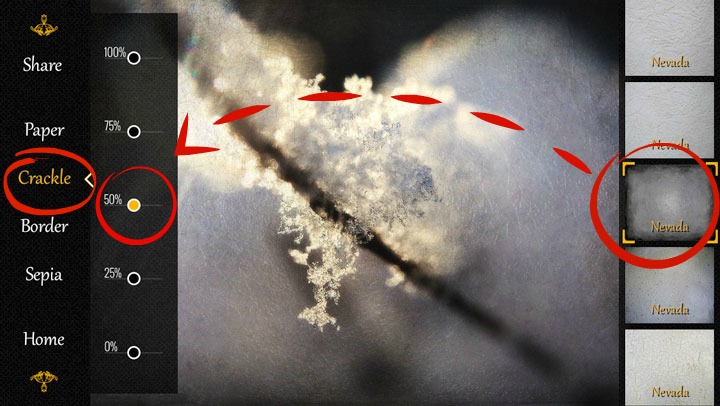
3. Now choose the Crackle effect, and choose the Nevada layer from the right (shown below - number 8 from the top), and adjust the opacity of the layer to 50%. 


4. Do the same with the Paper layer - Choose the Nevada-effect shown to the right, that is, number 2 from the top, and set it also to 50% opacity. 


5. That was easy, wasn't it! Now you have finished editing your photo in the Classic Vintage Photo app, and it is time to save the photo on your camera roll: 
Choose Share, and photo library - now your image is saved in the camera roll of your iPhone.


I wanted to remove the frosty effect from the middle of my photo - to get the sharpness and clarity of my original image to the center point - and I used Image Blender app for this. 

So from now on, we proceed in the Image Blender app:

6. Open first your original image in the Image Blender app, by clicking the icon in the lower left corner - your camera roll opens, and you can now choose your original image.


7. Then click the lower right icon, and choose the Frosty Window from your camera roll.


8. Choose the Mask option, and remove the Frosty Window effect from the desired area of your photo. Click the Save option in the upper right order. 


9. Then set the opacity continuum all the way to the right, so you can see the Frosty Effect photo, now with a clear and sharp (your original image) being visible in the middle - and save your image to your camera roll.


And, that's it - 9 easy steps to create a beautiful, winter image ... Like looking through a Frosty Window. This is my favourite combination at the moment in Classic Vintage Photo Editor.


What are your favourite apps at the moment? 

Come and link your recent mobile photos to App Happy Wednesday hosted by Barb at Keeping With The Times.

... With App-Happy greetings,
Nina


Classic Vintage Photo Editor is at the moment free in the App Store. Image Blender is available in App Store for $ 2,99. 


Wednesday, 10 September 2014

Tangled FX [App Happy Wednesday]


I spotted this pretty flower as I was walking in the neighbourhood. I fell for the round, high top of the flower - and the orange - green color-combination. I wanted to highlight the sharp structure of the flower top, and chose therefore to edit the photo in Tangled Fx.

Tangled Fx is a creative painterly app. It has 16 different painterly effects, from "Brush Strokes" (which I have used in the photo above) to Fibers, Swirls, Bloom and so forth. Tangled Fz allows you to adjust the strenght of the chosen effect, together with the color boost, contrast, gamma and hue shift.


I edited the photo making the following changes:
  1.  I used Camera+ -app to take the picture with. 
  2. I adjusted the brightness, contrast, warmth and ambiance in Snapseed-app. 
  3. Masking the flower in TadaaSLR-app, I created a blurry background with a bokeh-effect. 
  4. I used Mextures-app to add warm sunlight in the background. 
  5. In Tangled Fx-app I selected the Brush Strokes-effect - that highlights the flower top and also the grass  and leaves, creating a delicate painterly look. 
  6. Finally, I took the photo to PhotoToaster-app, where I chose the White Brush-frames to the photo.

What is your favorite creative photo-app at the moment? 
Share your photos and thoughts at Barb's App Happy Wednesday:


Keeping With The Times

Until next time,

Nina

Sunday, 1 June 2014

Strengthen the Sunlight with Photo Veils {Photo Recipe}


Summer and the life in the Great Outdoors has arrived! The nature is in blossom in the forests and by the lakes. 
We are cherishing the moments in the sun - and I am capturing many of them, making the memories last ... 

I wanted to strenghten the sunlight in the upper right-corner of the photo below using photo veils, and this is how I proceeded:


Photo recipe:
  • I increased slightly the brightness and the contrast of the original image.
  • Thereafter I added the following 3 photo veils:
    • Lemon Glow Right from the Illumination Collection, blending mode soft light with 100 % opacity. 
    • Sunshine 4 - Top Left - Vertical from the Illumination Collection, blending mode soft light with 30 % opacity.
    • Light (a veil that adds a natural vignette to the photo), also from the Illumination Collection, blending mode soft light with 50% opacity. I brushed this veil away from the top-right corner, to sustain the sunlight effect.
Photo Veils from the Illumination Collectiong will add a natural, warm light-effect, strengthening the sunlight in your photos. 

Let's enjoy the moments in the nature and make most of the season for outdoor life 
- capturing these moments as they unfold ...

Nina

Thursday, 29 May 2014

Classic Vintage Photo editor {App Happy Wednesday}


Barb Brookbank hosts an inspiring App Happy Wednesday on her blog Keeping With the Times, where you can share your favorite phone photography images and tell a bit about how you have edited them. 

I found recently the  Classic Vintage - Photo editor app, which enables you to add a touch of vintage to your photos. You can choose and adjust the paper, the type and amount of the crackle-effect, the border and the sepia effect, from 100% - 0 % opacity.

I used an extern macro-lens Olloclip when I took a photo with my iPhone of the flower, I received from my sweet friend. Using Image Blender App, I added a layer of the same flower, just smaller, in the lower left corner. Then I took the picture to the Classic Vintage - photo editor app. 


I chose a paper from the Montana Collection, adjusting the sepia effect down to 25%. Therafter I added a crackle effect from the free collection, with 50% opacity. I liked the old paper effect, so I didn't choose any borders.

The possibility to adjust the amount of the effects is great, the different types of papers, crackles and borders gives you numerous variations in creating photos with vintage effects.

For more inspiration, come and drop by at Barb's App Happy Wednesday!


Nina

Keeping With The Times

Tuesday, 29 April 2014

Create a Sense of Depth with Photo Veils {Photo Recipe}


The weather has been warm here in April. The delicate scent of the blossoming flowers and the sound of buzzing flies and bees fills the air ...  I enjoy the photo walks in the spring time! 

I had my point-and-shoot camera with me this time. I was taking a close-up picture of this pretty thisle, as a fly landed on it - Voila! The fly was hovering above the thisle quite some time, so I took a few more shots.

I wanted to get a picture with a clear subject in the middle, against a blurred background, to use it in creating a feeling of depth to the photo by using photo veils.


Photo recipe:
  • I increased the contrast of the original image to start with.
  • Thereafter I added the following 2 photo veils:
    • Bells of Ireland from the Botanical Collection, blending mode soft light with 75 % opacity. I used a soft round brush with 40 % opacity to remove some of the veil from the Thisle flower and from the fly.
    • Medium from the Illumination Collection, blending mode soft light with 100 % opacity.

- Simple as that! The Photo Veils give a natural effect, creating a sense of depth to your images. I my opinion photo veils from the Botanical Collection are perfect for nature and flower photography - They blend softly to your photos, giving a delicate finishing touch.

Nina

Saturday, 12 April 2014

Vintage Black and White Photo Effect with Photo Veils - Photo recipe


We have an old box filled with faded black and white photographs from my husbands grandparents. Every now and then we look at the photos together with his sisters ... I enjoy hearing their childhood memories, as well as admiring the time's warm patina on the photos.
 
I wanted to create a vintage-like black and white photo effect using Photo Veil Collections from Love That Shot.
In order to let the light fall on the tulips alone, I chose a dark backdrop - actually a blanket of cashmere and alpaca - that would not reflect light. The texture of the blanket would create fine a contrast to texture of the tulip petals.
 
My focus was on the lowest tulip, so I used spot metering. The daylight light fell on the tulips from the window to the left, creating natural highlights and shadows.


Photo recipe:
  • I converted the photo to black and white in Lightroom, using the B&W Contrast High-present. Therafter I increased slightly the highlights and shadows.
  • I added the following 4 photo veils:


Photo veils create subtle and seamless layers, enabling you to achieve the effect, that suits to your style of photography. 

... Until next time,

Nina

Monday, 2 December 2013

DIY Paper Heart Garland


Paper Heart Garlands are easy to prepare and a nice crafting idea for home decoration.
It took me about 60 minutes to make these 9 paper heart garlands, using materials I  already had at home. I adjusted the lenght of the garlands by varying the number of paper hearts from 3 to 5 hearts / garland.
 
You will need:
- a heart paper punch
- some paper with print - I used an old school textbook, that is made of strong and slippery paper
- one small bead for each garland 
- white sewing thread
- a needle
- scissors


I proceeded as follows: 
  • I started with punching the hearts. I noticed afterwards that some words were randomly placed in the middle of the heart, like "dilemma" (I used an old textbook from Qualitative Research Methods :-)
  • I then clipped the hearts out with scissors.


  • I fastened the bead to the thread by binding a knot.
  • Then I connected the hearts, one by one, using three double stiches on each heart. I left a space about 4 inches between the hearts.
  • Finally, I bound a loop at the end of the each garland, so I could hang them up.
  • I made 9 garlads in all, three to each window, with different lenghts.


- And that's about it - pretty easy, aint it!

Crafting Paper Heart Garlands is a fine way for repurposing an old book, and for making timeless, wintery decorations.


... with hearty greetings,

Nina


Sharing with
 

Tuesday, 15 October 2013

Flags in the Wind {Editing process- tutorial}


Astound me with love
A part of nature in me
Being my strong wind
 
Be My Strong Wind by Patrice Brown


 :   :   :
 
 
These flags in the wind caught my eyes the other day,
as I walked to this kindergarten  that belongs to my district at work.
 
The sunlight  and the wind changed these flags to a vivid, living mosaic,
as the leaves in the trees were casting shadows on them.
 
I grabbed my iPhone and took a snapshot ...
 
:  :  :


I admire the beautifully edited photos on the blogs I regularly visit, being curious about the textures used to enchange the pictures.
Inspired by this curiosity of mine I decided to share here my proces of editing the flags in the wind-photo.


My editing process:
  • I started with cropping the photo, removing the roof from the lower right corner, yet maintainin the square form of the photo.
  • I adjusted the light, contrast, higlight and shadows in PicMonkey (a free photo editing program), and added the textures of Kim Klassen and French Kiss Textures with the same program. Using Multiple Blend Mode, and fading the visibility of the textures down 80-90 %, adding just a soft touch of the textures.
  • I brushed the textures from the flags with a brush strenght 80 %, making the flags stand out, yet with a slight feeling of the textures.
  • Thereafter I added the brush from FrenchKiss using the Overlay-function in PicMonkey. I changed the color of the script to a soft Bbown color, and made it less visible with the fade function.
  • In the end I added just an inch of soft light using Pixrl Express, by choosing Jessica from the Soft Effect (just about 5 % to give the photo a warm glow).

:   :   :
 
 
We're having Fall Break this week -
I'm enjoying these cozy days with the family,
walks in the nature, and just being ...
 
Sunshine to your week,
 
Nina

Sharing with

Kim Klassen's Texture Tuesday
Nancy Clayes' Tuesday Muse
Kent Weakley's Sweet Shot Tuesday


Saturday, 24 August 2013

Sweet Saturday & Iphoneography Tutorial


I was a lovely feeling to wake up well rested ... And to know, that our calendar is filled with empty space today: Maybe a walk outside, a tour to the library, spending extra time in the kitchen. I find baking very relaxing, and I'm sure there's a new cup cake recipe waiting to be discovered ...

Well, like I wrote in an earlier post, I've taken a bunch of snapshots with my iPhone this summer. A great inspiration for me was an online Phone Photography Project by Big Picture Classes, with a specific prompt for every day. I was introduced to many phone applications, some of which I have edited the photo above with. 

And I came up with an idea to share here how I edited this photo, using specific phone applications:


Hipstamatic


Hipstamatic App: Salvador 84 lens, DreamCanvas film

Hipstamatic uses its own special camera inside the app, where you need to choose which specific lens and film you want to choose, before taking the photo. Salvador 84 lens distorts the reality in a fun way - you never know exactly how, before you take the picture. Here the lens took two pictures blended in one, which I like - it's making one focus on my watch, and thereby on the time. I chose to use DreamCanvas film, which adds both a canvas texture and a painterly boarder to the photo.


Afterlight


Afterlight App, Goldfinch filter 100 %

Thereafter I opened the picture in an Afterlight App, which has 27 different filters, adjusting the light in different ways. One of my favourite filters is called Goldfinch. It adds an extra dimension warmth to the light - as you can see in the photo above, where I've used Goldfinch filter.

Snapseed

Snapseed App, Retrolux Style 4, Texture Soft 1, Brightness-50

Snapseed is probably the App I use most often. You can tune the brightness, ambiance, contrast, saturation and white balance of the photo. You can also straighten, crop, tilt, focus, and use other editing options. 
Besides these, Snapseed has lovely frames and retrolux filters, which brings a dreamy vintage-feeling and beautiful light effects to the photos. Retrolux gives you the opportunity to add both textures and light leaks to the photos. I have used here Retrolux filther Style 4 with a Soft 1 texture, without any light leaks.

Rhonna Designs

Rhonna Designs-App

The last step was Rhonna Designs App, which I'm still learning to use. This app has many beautiful and cool fonts, graphics, banners, chalk, encouraging quotes and frames.
I have added the Saturday-tag, "The best things in life are free"-tag and the circle-formations from the app - I have only adjusted the colors, rotation, size and opacity. Then I choose a simple font and added the text "Sleeping In" inside the circle, and chose to add also this little striped line inside. 

After sending the picture to my computer, I used Picmonkey to downsize the picture to 640 x 640, and I added a layer of soft pink called Rapture (30 %), also from Picmonkey.


I hope you enjoyed following along...

Here's a printable for your slow Saturday mornings :)

Sunshine and many snapshots to your weekend!

Nina


Sharing with 


Friday, 14 June 2013

iPhone-snapshots from the Week


On Tuesday I met up with my friend in down town during a lunch break. It was both a happy and a sad meeting: It was so good to see her and catch up, but -  After 3 years in Denmark she and her family are moving back to their homeland this fall! I will miss her sweet and tender spirit ... but ... we'll surely keep in touch both by mail and when possible, meeting both here and there.


As I was biking back home that day, the skies turned all of a sudden dark and it started to rain ... These soft, small raindrops were falling down - like small tears ... Saying farewell is not easy - Yet, we're to be thankful for the shared moments,cherishing them and our friendship.


Next morning I just couldn't find my keys! I checked every purse and bag I could get hold of, and also all the pockets and other places, I usually keep my keys. But without success - My keys we're nowhere to be found.
Well, I had to go to work without my keys to our house. I was wondering if the keys had fallen out of my purse, while I was biking the day before.

When I came home, my husband smiled to me and says, that he has found my keys on our back door! I could then remember, that I had let the keys stay at the door as I was picking up the groceries ... and I must have left them on the door as I went inside ... Well - now my keys are found!


"Mirror" was a theme of I Heart Face's daily photo challenge. It was already late, so I grabbed my phone and took a snap shot of the bathroom. Thereafter I used different iphoto applications to edit it:
1. Original image
2. Using Snapseed to adjust the contrast and PhotoToaster's Fade Out-effect (remowing frames)
3. Photo Toaster Polaroid-effect (removing frames)
4. Picfx Black and White-set Black 1, Urban-set Contrast, Cross Process- set Cross One
5. Photo Toaster - Deluxe: Lite Portrait (removing frames), Mextures: Yololomo Orientation 3 opacity 30, Dusted, orientation 3, opacity 30.


The roses from last week are decorating the kitchen of my friend now- it seems like the roses would be growing from the plate, that has a few painted flowers on the edge. I have edited this snap shot with the Glaze-Photo application.
 
A week with happy moments, sad moments,
a bit confusion, restlessness,
stillness ...
laughter and tears,
- gratefullness.
 
: : :
 
A warm welcome to my new blog friends
Milena, Anastasia, Tracy, 2Momma2, Uniquely Undone,
Amy, Britney, Melani, Zina, Mama Roach and Amanda!
 
May there be rays of sun shine & moments of joy
in your weekend,
 
Nina
 
 
Sharing with 
 
Nancy's Rural Journal
//